The problem
A nice feature the Qnap NAS implements is the rsync server, so that remote machines can backup data to the device.
But when traffic goes throught the internet, we need some more secutity, encrypting the data sent on the net.
The simpliest way to do this is to use rsync over SSH Tunneling, in this way the traffic from rsync client to the server is fully encrypted.
But when traffic goes throught the internet, we need some more secutity, encrypting the data sent on the net.
The simpliest way to do this is to use rsync over SSH Tunneling, in this way the traffic from rsync client to the server is fully encrypted.
The solution
The macro step should be accomplished to reach our goal are:
- Generate private/public keys to authenticate between host and client
- Configure the Qnap authenticate using the public key
- Configure DeltaCopy to use the private key
Generate private/public keys to authenticate between host and client
First of all we need a public and privete keys pair, there are various possibilities to generate them.
If you already have a pair of OpenSSH keys, you can jump to the next topic, follow a description of how to create a key pair with openSSH on a windows machine.
This procedure can be executed on any machine not necessary the one you want to backup.
If you already have a pair of OpenSSH keys, you can jump to the next topic, follow a description of how to create a key pair with openSSH on a windows machine.
This procedure can be executed on any machine not necessary the one you want to backup.
- Download CYGWIN from http://www.cygwin.com.
During configuration, select to install openSSH library. - Start BASH, the console for CYGWIN
- Type “ssh-keygen”. If you get a command not found error, something went wrong during installation.
- If the command is executed, will ask for the file where to save the keys, the path should by given in the following form:
/cygdrive/c/Program\ Files/DeltaCopy/sshkeyWhen asked to enter passphrase, just hit enter. DO NOT specify a password.
This should create two files (sshkey and sshkey.pub) inC:\Program Files\DeltaCopyfolder.

- sshkey is your private key.
- sshkey.pub is your public key.
Configure the Qnap authenticate using the public key
The support offered to ssh by Qnap at the actual stage does not allow to login with a different user then admin by SSH.
Usually key have to be placed on $HOME/.ssh directory, in our case we append the public key sshkey.pub to the file /mnt/HDA_ROOT/.config/ssh/authorized-keys.
That’s all, now our ssh server will accept our certificate for logging in.
Usually key have to be placed on $HOME/.ssh directory, in our case we append the public key sshkey.pub to the file /mnt/HDA_ROOT/.config/ssh/authorized-keys.
That’s all, now our ssh server will accept our certificate for logging in.
Configure DeltaCopy to use the private key
The configuration of delta copy is quite straight:
- copy the private key sshkey to the DeltaCopy installation folder.
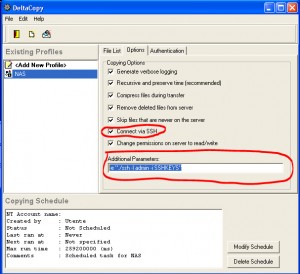
- check the “Connect via SSH” checkbox.
- Add the following addition paramenters: -e “./ssh -l admin -i SSHKEYS”
- run the task and verify all it’s ok.
Sometimes if the machine is has not already been connected, you will get an error.
To avoid it, from a command prompt located in the DeltaCopy folder run ssh -l admin -i SSHKEYS and give the permission to trust the remote nas when asked.
Now it should really work.
Possible improvements
Because of Qnap’s ssh implementation limitations, we always have to connect as Admin, this is not a good practice.
It would be nice at least to disable password authentication and allow only certificate authentication, in my opinion this should be a fuature to be inserted into a new firmware version.
By hand this can be done editing /etc/ssh/sshd-config with the following instruction:
It would be nice at least to disable password authentication and allow only certificate authentication, in my opinion this should be a fuature to be inserted into a new firmware version.
By hand this can be done editing /etc/ssh/sshd-config with the following instruction:
PasswordAuthentication no
Unfortunately this change to the configuration will be overwritten after each reboot, even if many tutorial are available on this topic, I did not succed to made the change permanent.
To compensate for this, set a really strong passworg for the Admin account, and if possible also IP filters.
To compensate for this, set a really strong passworg for the Admin account, and if possible also IP filters.
What has been used
All procedures described in this article refers to the following hardware and software:
- Qnap TS-212, Firmware Version 3.5.0 Build 0816T
- CYGWIN 1.7.9
- DeltaCopy 1.4
Bibliography
I would like to thanks all the authors of the following articles to have explained various expect of the topic.


